Pallet Sectional Part 7 Cushion Creation
- Bonny

- Mar 13, 2019
- 8 min read
Updated: Aug 27, 2019
Keep it simple....silly! Making cushions for outdoor use does not have to be expensive nor difficult. It's so much easier that I thought. It is not a professional job but one I am still very proud of. Follow along as I learn a new tool, learn the value of patient and not giving up when it doesn't go right at first. This cushion really is more than a fancy place to set your ass....it was for me a lesson on thinking inside the box.

We have cut our boards and the padding has arrived...So, now what? I had done a cushion of sorts in the past but it was for a parlor seat and it was round- not an awesome shape in my book. It posed a bit of a challenge but at the end of the day turned out pretty. This time however I was thinking that a square shape would be much easier to handle. It was but sometime you need a buddy to help, so I asked my son Darrian to give me a hand on this project...well more like a foot.
Foam cutting and measuring.
I had already cut the plywood down to the size, double checking my measurements - I need it to be 22 inches wide and 44 inches long. I recommend cutting the plywood first to the measurements you need them to be before cutting down your foam. If you got the board, the rest is pretty much trace, cut and paste. notes..journal...bla bla bla. Always. I am starting with the smaller of the two sectional pieces, the chair side if you will. I will need to order more foam in the future when it comes time for the couch side. I figure if I start out small, I will learn what needs to be done along the way to finish the larger one.


Here is what you'll need for this piece of the project
Foam- Mine is 3 inches thick and Medium Density.
Plywood board. Mine is 22x44 inches
Wood glue
A sharpie
Box cutter or jigsaw
A hammer
Staple gun
Batting
Plenty of room to work in.
A banging glass of Pinot Grigio
I did not have to measure the foam separately. In fact I found it much easier to law the foam on the floor and the plywood on top of it, I just traced the damn thing out. Pretty sinchy!
I did give myself a half inch play room at first but realized that cutting the foam down like that might cause gaps or misshaped corners. At the end of the day decided to measure twice and cut once. I am so glad I did.
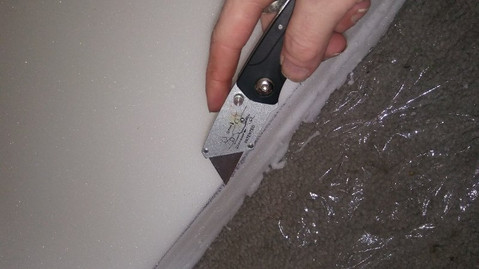
You will need a very sharp box cutter or knife to cut it with. Make sure you have plenty of room to work with as you may find yourself moving around the foam to get the right angle on your cut. For me the best thing to do was follow my line, at a bit of an angle. Using slow, steady and firm pressure and sliding the knife rather than pulling. This gave me not only a great shape to work with but cut down on the shaving, which I would have messed up for sure. If your more comfortable, you can also use a jigsaw to cut the foam as well. Use what you have.
While you cut, try not to push down or clamp the foam. This makes it uneven and can potentially give you the wrong depth. My foam
Once you cut a corner, re-align the cushion on the board, just to be sure your still cutting straight. Leave yourself a tiny bit of room for error. If you do mess it, do not worry. There is a way to cover it up and no one will ever know. But for now, just go with even, firm strokes.
Once you have the exact shape you want and you've made your cuts, hold on to the rest of the foam for later. These when cut in half are actually perfect back rest size pillow shapes and will save me later on repurchasing more foam.
The next step requires a few more tools. I am so excited about this new addition to my tool arsenal, An electric staple gun!!
I had no idea the love I could have for a power tool...this bad boy is my new favorite!

The thing about new toys is, you need to test them out before you use them. This little guy gave me fits for about a half hour before I could actually be comfortable enough to use it. It has 2 main security features that make sure it can not go off on it own. Good thing too! Learning to load it took me a minute because it did not load as it stated and I was overly excited.
Before you actually lay a staple out, you need to learn how to adjust the depth and strength of your machine. Mine seemed a bit wishy washy at first so I tested it on a piece of wood several times before starting to actually tack anything. This will allow you time to get pro on it as well as make your project go much smoother.
Attaching your board and foam
This part is pretty easy so long as you don't have your fir-bestie helping you. I am not sure if it is the new cushion Babs was really in to or if it was the camera but notice the sass! Thats my girl right there!
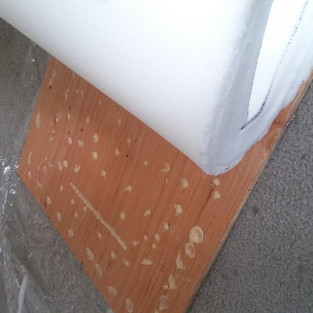
Once you have your foam and board cut, my suggestion is to glue it down before you try and wrap the batting and fabric. This just makes for perfect square angles and for me it was easier to work with one solid object verses two and one that may slide across the other before I have a chance to get the fabric figured out.
Lay the padding down flat on the plywood. Once you have it in place, lift each side by rolling it back off the board. Dabbing your glue all over, this technique gives you freedom of motion without having to constantly make sure you are square. Do this for each side and make sure you get the corners well. Do not clamp the foam to the board. With wet glue on a porous surface, clamping can make the glue go into the tiny holes of the foam and can eventually harden the wrong area or possibly risk glueing it to the board squished. Just lay something heavy on top of it for an hour or so to dry. While your waiting for it to dry, you can begin cutting your fabric and batting.


Fabric 101
As we discussed in Part 6, finding the right fabric can be an adventure and rather expensive. I have chosen to go with a rather neutral color and use outdoor material. Be aware however that not all outdoor fabrics are hefty nor are they all waterproof, so do you home work before purchasing your final piece.
Outdoor fabric is not meant to be ironed, but before you lay your board out, you'll need to get the wrinkles out so that your corners are even and straight. I put my fabric on low heat in the dryer with a wet paper towel for 3-5 minutes. Just enough to iron it out and give me a smooth finish.

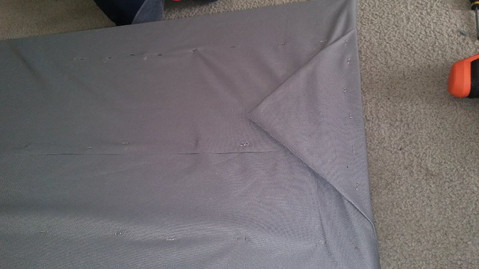
I laid out the fabric flat on the carpet and placed by foam and board on top of it. Making sure all of my sides were even and straight. From here, it was just a matter of getting up the guts to attach the thing and not worry if it was perfect.
I forgot one major component of this project and that is the batting. There is suppose to be a batting between the foam top and the fabric in order for the shape to be more uniform. I on the other hand did not think of that at the time and did not have more money to purchase an extra item at this time, so I used an old towel that was still in good shape. It was the perfect size and wasn't to bulky. Don't be afraid to recycle, reuse and use what you've got in the projects you create, the more material you don't have to pay for the better.
Tacking and folding
I had decided that I would wrap the entire board rather than trying to just tack the ends and hope it lasts all year. Despite the fact the plywood is heat treated and the fabric is weather proof, the outdoors are harsh on your


creations, so every little step you can take to help protect the wood inside the better. You can always replace the fabric later.
I started on the outside of the boards and moved inward, stretching as tightly as I could. This is where my sons foot came in handy because it was easier for him to push on the board towards me, while I pulled on the fabric. I stapled the middle and moved to the outward corners.
Each time I made a tack, I would rotate around the board to be sure each side was even and flat. Once I had my sides tacked down I then began the process of folding and working the side pieces to a smooth fold. This was not an easy task, I will tell you I did suffer a bit of frustration on this part. Once I got one end perfect and ready to tack, the other side would fall apart and I would loose my perfect seem. This happened several times before I got wise.
I went over my midline seems just one last time before actually tacking the ends. Stretching and straightening as I went.
Once I was ready to actually tack the side, I had to learn to stretch the materials and tack at the same time. A buddy would of been helpful during this part but easy enough if you can use you knee to hold the board, one hand to add pressure and the other to staple it down.
As you can see in the picture below if you stretch the middle of the fold first and tack it down, the rest is a matter of keeping your folds together. The key here is to really make the staples depth just enough to tack the fabric, if you mess up or you did not stretch it far enough, the staple is easily removed and you can start over.
This middle tack is super important I found out as it is really the center of stability for your side folds. It gives you strength in stretching as well as keeps you square on the board.
Once you have all of your staples in place and your happy with your results, hammer the staples down into place, making sure you start in the middle of your project and move outwards. I have found that using going the same route I went to lay them out when hammering them into place kept staples even and without bending.
After flipping the board over I noticed that I hadn't stretch far enough on one side, so removed the staple, stretching the material, was able to tack it in to place without hesitation.
At the end of the day the finished product is stunning. I can't wait to see what it will look like when I finally get to put it into place within the sectional.
I have become far more confident in my projects and creations lately. I believe that is because the husband I was trying to divorce has returned 3 times during this project with love and promises and each time I have had to learn that it was not real. The more I dive in to healing the more I realize what I can build on my own, I never really needed him for. My divorce will be final soon and I am hoping around the same time this project will be ready to begin assembly. It has been such a tough few months and I don't think I would have survived it all if it hadn't been for doing this project and sharing it with you. This blog has given me a sense of self and self esteem. I realize now I did not need a man to show me love or make me feel worthy, I had that inside the entire time and now I am able to show that in these creations.
For every woman out there who thinks they can't or are not worthy, I want you to know that there is no bigger lie on the planet. Once you find yourself, once you free your heart, once you realize your own worth...I truly believe there is nothing that will stop you. I will not be torn down by a man who lies, cheats and betrays. Instead I will build a world full of beauty and hope and pray one day Karma does the rest.
You can do this folks, you are worth it. Find yourself in your own creations!!!


Comments